I think it's a girl thing, because Peanut loves playing masak masak now. She loves serving us "drinks" in her toy cups and saucers, and forcing us to eat the fake oranges and watermelon. If we don't pretend to eat it, she'll scream bloody murder! Seeing that she loves the kitchen, i went sourcing for a toy kitchen set. Ikea used to sell wooden toy kitchen sets but sadly they have discontinued it. There's still one more kitchen set on display in the toy section in Ikea. I love it cos it's wooden, and it's all pink and yellow..
Toys'r'us sells toy kitchens as well but it's plastic and very small.. Peanut will tower over her kitchen if i buy those for her. I don't really fancy buying those cos it looks so fragile. One kick of a leg and it'll fall apart T T. ELC sells wooden kitchens but it cost around RM800 plus and above? I don't wannna spend so much on something that it's probably gonna get played for a little while..and i have to think of ways to dispose it in future.
And have you seen those play kitchens on Pinterest?? omg..those people are seriously talented..they actually build toy kitchens from scratch, or from a discarded cabinets etc. i'm neither a carpenter, and neither do i have the necessary skills with all the power tools..so i did the next best thing. I create play kitchen from boxes + and a stool! And here's the result. Haha. Nowhere near as good as what you can see on Pinterest but it will do la. And Peanut loves it. And i can recycle them after she's done with it for good!!

That's a 'television' on the left, which was requested by Peanut lol. I used two bendable straws as the antenna so you can actually adjust it for 'reception' haha.
It took one giant Mamypoko diaper box, one half of a LCD tv box, and a square wooden stool with a cushion on top to create the base for this kitchen (you don't have to use a stool of course. This can be easily replaced with a box, but because i have it..i might as well use it) I removed the cushion obviously, and put a cardboard on it. Just a note, the boxes that i used are pretty solid. It doesn't bend easily, and I have to use a box cutter to cut for size. You can't use the boxes which they packed those canned drinks or instant noodles in because those will be too soft.
I also used a stainless steel bowl that has a rim as a 'sink'. I cut a hole in the cardboard (which i have wrapped with colored paper) and then put the bowl on top. And a Biore facial wash pump as the water tap. I also hung an ikea basket at the side so Peanut can store some of her stuff in it.

This is my oven + stove on top. I covered the boxes in brown paper, and then a black colored strip of paper at the top. Plastic bottles caps are used as oven dials.. i also cut a hole in the box for the oven and with the cardboard that I cut out, I created the oven door. I poke two holes at the bottom of the door, and another two on the boxes. I tied a string through the holes to act as hinges.

To close the oven, I used a velcro sticker (which i happened to have lying around the house) . Basically i used whatever i have around the house to make this kitchen.
This is the inside of the oven. I create a shelf inside the oven by using those polystrene stuff (the stuff that is used to protect your goods in boxes) as the shelf holder and I cut a cardboard to use as the shelf. I used my glue gun to stick it. I love the glue gun. You can use it for anything!!!
If you open the curtain (which i sewed from leftover fabric from another project), there's another shelf inside so that there's more storage space for Peanut's food stuff. You can get similar ready made curtain at Daiso.
This is the back part of the kitchen, which is held by a hard piece of cardboard. I then build 2 more shelves, by using the same polystrene thing as the base to hold the shelves.
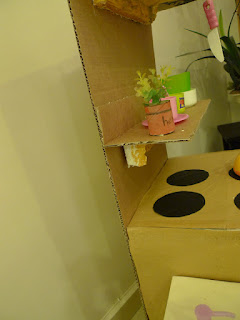
And i painted the polystrene in brown color so that it looks like wood. I also added screws in (saja only) to make it look more authentic. I secured it using the glue gun so Peanut can't take the screws out and leave it on the floor for BabyD to put it in his mouth.
My shelf. Created a flower pot from a toilet paper roll haha.

Some hooks to hang Peanut's knives and chopping board. Again, I secure the hooks by using glue gun so it can't be taken out. And that's it!!
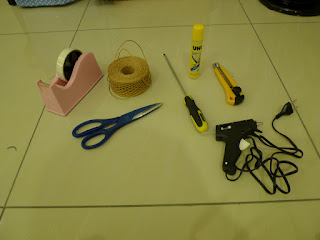
a) tape
b) scissors
c) brown paper string (from Daiso)
d) glue
e) long and thin screwdriver to poke holes into the boxes.
f) large sized box cutter knife
g) glue gun (from tesco)
Peanut posing wif her kitchen.

Little brother watching the construction from afar. :)


6 comments:
nice kitchen... she definitely loves it ya..
cyn: yeah she does :) luckily.
OMG... so nice Peanut's kitchen. And you're so rajin!
christine: no lar, use glue gun and scissors quite fast hehe
OMG... this is AMAZING!!!!!!!!!!!!! Did you document the step by step of doing this?
claire: haha thanks :) no lar didn't document. The kids always around touching this and that, so no time to take a decent pic. Everything need to be done fast! haha
Post a Comment